
To install and run Drupal your web host must meet certain minimum requirements. Most web hosts meet these requirements. However, a few stand out by also supporting the Drupal community. If you need a host, consider selecting one of our reviewed web hosts.
Introduction to installation
Drupal provides an installation script that automatically populates database tables and configures the correct settings in the settings.php file. This section covers preparing for installation, running the installation script itself, and the steps that should be done after running the installation script has completed. It also explains how to do a "multi site" installation, where a number of different Drupal sites run off the same code base.
Before proceeding with your first Drupal installation, you should also review the best practicessection. For help with Drupal terms, see the glossary page.
Before proceeding with your first Drupal installation, you should also review the best practicessection. For help with Drupal terms, see the glossary page.
Other tools
Some of the steps in the installation process can be performed with tools such as graphical applications for moving files and managing databases or tools that are provided by your hosting service. This documentation focuses on performing tasks at the command line. For information on using other tools, see the documentation that accompanies the application or is provided by your hosting service.Creating a test site on a local computer
It is considered a good practice to do all development work on a separate test site before making changes to a production site. A test site allows you to evaluate the impact of upgrades, new modules, modifications to themes etc. without causing disruption to your live site. For information about setting up a web server on a local computer, see the Local Server Setupsection of the Developing for Drupal guide.Alternative methods for installation
Some web hosting companies offer "one-click" installations of Drupal, or specific Drupal support. You may be able to locate one on the Drupal hosting page (these hosting companies also support the Drupal project).
There is also information about Drupal distributions, which include installation profiles and pre-packaged distributions of Drupal and modules. These may be of help as well.
System requirements
About hosting
To install and run Drupal your web host must meet certain minimum requirements. Most web hosts meet these requirements. However, a few stand out by also supporting the Drupal community. If you need a host, consider selecting one of our reviewed web hosts.Drupal's minimum requirements
Disk space15 Megabytes for a minimum base installation, 60 MB with many contributed modules and themes, and more for database content, media, backups and other files. Web server
Apache, Nginx, or Microsoft IIS
Unfortunately Drupal still does not work properly on some systems running Ubuntu. Database server
Drupal 6: MySQL 4.1 or higher, PostgreSQL 7.1,
Drupal 7: MySQL 5.0.15 or higher with PDO, PostgreSQL 8.3 or higher with PDO, SQLite 3.3.7 or higher
Note: Microsoft SQL Server and Oracle are supported by an additional module PHP
Drupal 6: PHP 4.4.0 or higher (5.3 recommended)
Drupal 7: PHP 5.2.5 or higher (5.3 recommended)--some of the modules require 5.3
Drupal 8: PHP 5.3.10 or higher
Drupal 8 can no longer be installed on hosts with the 'magic_quotes_gpc' or 'magic_quotes_runtime' PHP ini settings turned on; these setting are deprecated in PHP 5.3 and have no effect anymore in PHP 5.4.
Note: if you meet these requirements but still have problems with your site, be sure to read through the Webhosting Troubleshooting FAQ.
Step 1: Download and extract Drupal
Drupal is available in two supported versions (the most recent and the previous). The "recommended release" is the latest stable release of that version. To learn more about versions, see the Drupal version information page.
If you would like to create a Drupal site in a language other than English, information about Drupal translations is available at http://drupal.org/project/translations.
Downloading Drupal
Before you begin, log into your server and navigate to the directory from which you will be serving your Drupal site. On many *nix computers the path from the server's root will be /var/www/html, so cd /var/www/html. On a shared server, or a server that hosts multiple domains, the path will be different (try cd ~/www or cd ~/public_html). If you are unsure of the directory, ask your hosting provider for assistance.
Download Drupal using any download utility, the two most popular of which are wget and curl. Not every computer has both. The commands are, respectively:
wget http://ftp.drupal.org/files/projects/drupal-x.x.tar.gz
or
curl -O http://drupal.org/files/projects/drupal-x.x.tar.gz
(Note that the option for the curl command is the upper case letter "O" and not the numeral that stands for zero.)
(Replace the "http://drupal.org/files/projects/drupal-x.x.tar.gz" string with the link for the version you will be installing.)
Extracting Drupal
Type the following command (replacing "x.x" with your downloaded version's number):
tar -xzvf drupal-x.x.tar.gz
Remove the compressed version of the file by typing rm drupal-x.x.tar.gz.
Moving Drupal to its intended location
Now you need to move the contents of the drupal-x.x directory one level "up" into the web server's document root or your public HTML directory:
mv drupal-x.x/* drupal-x.x/.htaccess ./
For Drupal 7 also add mv drupal-x.x/.gitignore ./
The files from the directory you downloaded and decompressed have now been moved up a level into your web directory, and you can delete the drupal-x.x directory (which is now empty):
rmdir drupal-x.x
Before continuing to the next page ...
The base URL for your Drupal installation will be set in your web server's configuration file. You will need to know this URL before proceeding to the next steps of the installation. If you are installing Drupal on your local machine the base URL may be: http://localhost. If you are installing Drupal to a web server your base URL may be a specific domain name (such as http://example.com).
Step 2: Create the database
Before running the installation script, you must create an empty database and database user (a user name assigned the rights to use the Drupal database).
This page offers guidance for creating your Drupal database using a web browser-based control panel (such as "CPanel" or "Plesk"), or by using phpMyAdmin (another browser-based database utility), or by creating the database directly from the MySQL or PostgreSQL command prompt (for more advanced users).
Create a database and user via a browser-based control panel
Most web hosting accounts provide a Web-based control panel to help you administer your site. These tools include easy-to-use features for creating a new database, and for creating a "user" with rights to the database. To create a database using a browser-based control panel consult the documentation or ask your web host service provider.
When you create the user for your database, you may see a page where you can specify the privileges that user will have for various operations on the database. In most web control panels' "database wizard", if you simply check "All" privileges for the user you create (and then uncheck "Grant" if it is listed as a privilege) your user will be set up correctly.
Take note of the username, password, database name and hostname (eg. are you installing in http://example.com, or in http://drupal.example.com, or http://example.com/blog etc.) as you create the database. You will enter these items into fields in your browser when running the install script (see next page).
Note that in many cases when creating databases and users via a web-based interface, the username you use to log into your control panel is added as a prefix to the database name and possibly to the database username as well. For example, if you log into your site's control panel as "webadmin" and create a database named "drupal7db" and a user for that database named "d7user", when running the Install script (see next page) the database and user may need to be typed in as "webadmin_drupal7db" and "webadmin_d7user". (This is because many hosting accounts are on shared servers, and on one server each database and user name must be unique across all accounts on the server.)
If you have created your database and user via a web-based interface, you can skip the remainder of this page and continue with the install instructions on the next page.
Create a database and user using phpMyAdmin
This presumes you have root access to phpMyAdmin
- Log in to phpMyAdmin as the root user.
- Click Privileges and Add a new User OR you can use root user credential as well..
- In the User name field, enter the username you wish to use.
- In the Host field, select Local which is more secure, unless you will be accessing the database with this user from another server.
- Enter or generate a password for the user.
- In the Database for User list, select Create database with same name and grant all privileges and click Go.
You have now created a user that has all privileges only on the database with the same name. This is more secure than using a general username and password for all your sites on the same server, as it limits access to your databases if someone gets hold of your database logins.
If you want to have a different name for database and user, just select the created database, then click the operations tab. You will find an option Rename database to. If you need more details about using PHPMyAdmin, check out the official wiki.
Take note of the username, password, database name and hostname (eg. are you installing in http://example.com, or in http://drupal.example.com, or http://example.com/blog etc.) as you create the database. You will enter these items into fields in your browser when running the install script.
Note that in many cases when creating databases and users using a web interface, the username you use to log in to your control panel is added as a prefix to the database name and possibly to the database username as well. For example, if you log into your site's control panel as "webadmin" and create a database named "drupal7db" and a user for that database named "d7user", when running the Install script (see next page) the database and user may need to be typed in as "webadmin_drupal7db" and "webadmin_d7user". (This is because many hosting accounts are on shared servers, and on one server each database and username must be unique across all accounts on the server.)
If you have created your database and user via phpMyAdmin, you can skip the remainder of this page and continue with the install instructions on the next page.
Create a database from the command line
If you do not use a Web control panel or are experienced with and prefer to use MySQL or PostgreSQL commands, you can follow the information below.
Additional information about privileges, and instructions to create a database using the command line are available in INSTALL.mysql.txt (for MySQL) or INSTALL.pgsql.txt (for PostgreSQL).
Create a database using MySQL commands
The database should be created with UTF-8 (Unicode) encoding, for example utf8_general_ci.
For information on installing and configuring MySQL see http://dev.mysql.com/tech-resources/articles/mysql_intro.html
In the following examples, 'username' is an example MySQL user who will have the CREATE and GRANT privileges and 'databasename' is the name of the new database Use the appropriate names for your system.
Create a new database for your site.
mysqladmin -u username -p create databasename
MySQL prompts for the 'username' database password, and creates the initial database files.
Log in and set the access database rights:
mysql -u username -p
MySQL prompts for the 'username' database password.
At the MySQL prompt, set the permissions using the following command:
GRANT SELECT, INSERT, UPDATE, DELETE, CREATE, DROP, INDEX, ALTER, LOCK TABLES, CREATE TEMPORARY TABLES ON `databasename`.* TO 'username'@'localhost' IDENTIFIED BY 'password';
In this case:
'databasename' is the name of your database
'username@localhost' is the username of your MySQL account
'password' is the password required for that username
You will need the ` around the database name if you have used a MySQL escape character in your schema name.
Eg: drupal_test_account.* should be drupal\_test\_account.* for security (underscore is a wildcard). This requires the ` wrapper. `drupal\_test\_account`.*
Note: unless your database user has all of the privileges listed above, you will not be able to run Drupal.
If successful, MySQL will reply with:
Query OK, 0 rows affected
To activate the new permissions, enter the following command:
FLUSH PRIVILEGES;
Now exit the MYSQL prompt by typing:
exit
The server will answer by saying
Bye
Create a database using PostgreSQL
The database must be created with UTF-8 (Unicode) encoding.
Create a database user
This step is only necessary if you don't already have a user setup (e.g. by your host) or you want to create new user for use with Drupal only. The following command creates a new user named 'username' (you should substitute this with the desired username), and prompts for a password for that user:
createuser --pwprompt --encrypted --no-adduser
--no-createdb username
If everything works correctly, you'll see a CREATE USER notice.
Create the database
This step is only necessary if you don't already have a database setup (e.g. by your host) or you want to create new database for use with Drupal only. The following command creates a new database named "databasename" (you should substitute this with the desired database name), which is owned by previously created "username":
createdb --encoding=UNICODE --owner=username databasename
If everything works correctly, you'll see a CREATE DATABASE notice.
Step 3: The settings.php file
Settings.php
Your Drupal download comes with a sample configuration file at sites/default /default.settings.php. The default file must be copied and the new file must be given the correct name, settings.php.
Please note: With Drupal 7.x, on some types of shared/local hosting, if PHP and Apache are run by the same user, Drupal will attempt to execute the first three steps for you. If you get errors referring to the "Settings file" during installation, you can perform these steps manually.
Copy the default.settings.php to settings.php.
Do this from the command line (working from the root of the directory containing your Drupal installation) by typing
cp sites/default/default.settings.php sites/default/settings.php.
Please note: Do not simply rename the file. The Drupal installer needs both files.
You should now have a default.settings.php AND a settings.php file in your sites/defaultdirectory.
Make the settings file writeable, so that the installer can edit it, type
chmod a+w sites/default/settings.php or
chmod 666 sites/default/settings.php
Both commands have the same effect.
Several FTP tools like Filezilla, Transmit, and Fetch allow you to change file permissions, using a 'file attribute' or 'get info' command. In this case the file permission should be set to 666. If your FTP client has checkboxes for setting permissions, check both the Read and Write boxes for "Owner", "Group", and "Others" (but leave the Execute boxes unchecked).
Please note: Do not forget to change permissions back after you have run the installation script. Those permissions should be:
chmod 644 settings.php
chmod 755 ../default
To let the files directory be created automatically, give the web server write privileges to the sites/default directory.
chmod a+w sites/default
Step 4: Run the installation script
For Drupal 7
To run the Drupal install script, point your browser to the base URL of your web site.
The "base URL" means the document root (directory) where you placed your Drupal files (and is defined in your web server configuration file). If you have installed Drupal on a web host this will likely be a domain name such as http://www.example.com. If you installed Drupal in a subfolder, then you should point your browser to the subfolder (e.g. http://example.com/subfolder). If you have installed Drupal on your desktop machine this URL might be http://localhost/drupal.
If the installation process does not simply appear by entering the base URL of your site, add the file name "install.php" (for example http://www.example.com/install.php).
You will be guided through several screens:
Choose which profile to use for the installation (standard or minimal).
Most people should select the "standard" option. The standard option comes with default content types already enabled, such as Article and Page, and with appropriate publishing options already set. (Of course you can later edit these default content types and their settings, or add additional ones.) The standard profile also has a useful collection of modules pre-enabled for you.
The "minimal" option is targeted toward more experienced Drupal site creators who wish to set up their own content types with associated publishing options. The minimal profile has only three modules enabled: Block, Database logging, and Update status.

Select a language
If you want to install using a language other than the default English, click the Learn how to install Drupal in other languages link.

Verify requirements
If your installation directory is not yet configured properly, you will be informed at this step. You can correct the settings individually and either refresh the browser screen or click 'Try again' to see whether there are any errors left.

Possible errors include:
Missing directories and/or incorrect permissions
The installer will attempt to automatically set up a number of directories, but this may fail due to permission settings. In this case you will find the missing directories listed.
sites/default/files
sites/default/private
sites/default/private/files
These directories should be set to the following permissions chmod o+w sites/default/files OR chmod 777 sites/default/files
Missing settings.php or incorrect permissions
If settings.php is missing or not accessible, follow the instructions in Step 3: The settings.php file. Note that you will need both the default.settings.php and settings.php files.
Set up database
Enter the database name as well as the username and password for the database that you created in Step 2: Create the database. This username and password information allows Drupal to access your database, so the install script can create tables. Note that this is notthe username and password for administering Drupal; these will be created in the next step.
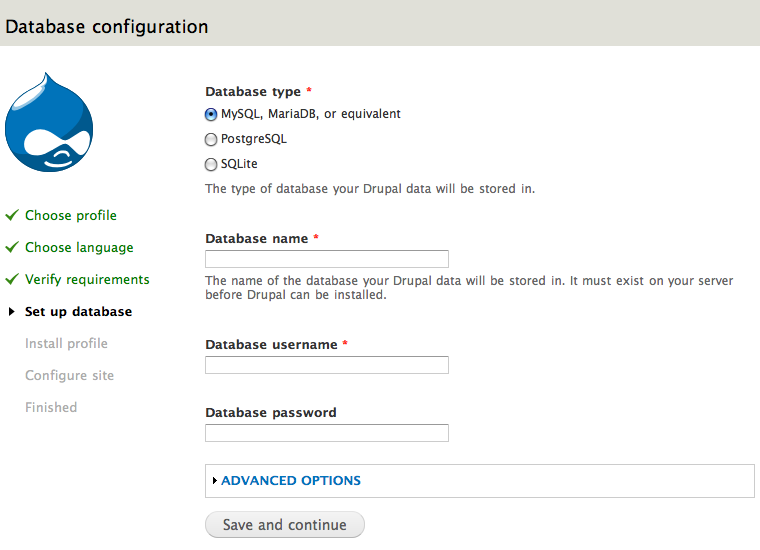
The Advanced options will allow you to change the database host ('localhost' is usually used in this entry: wamp/bin/apache/Apache2.2.11/bin/php.ini as an example of the location on a Windows box running WAMP). You can also change the port and the table prefix. You only need to change the port if you are using a non-standard port number. The table prefix is useful if you are installing multiple instances of Drupal tables that share the same database.
Click Save and continue at the bottom of the page.
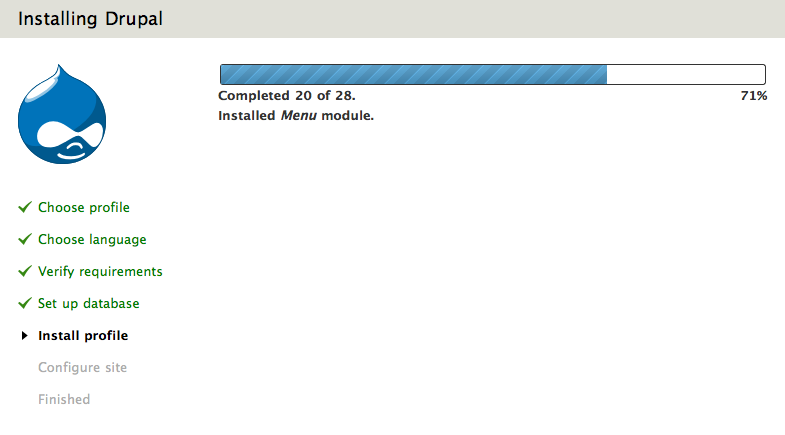
Install profile
A progress bar will appear and display notes from the installer regarding the progress of the installation. If no errors are encountered, the next page will automatically load in your browser.
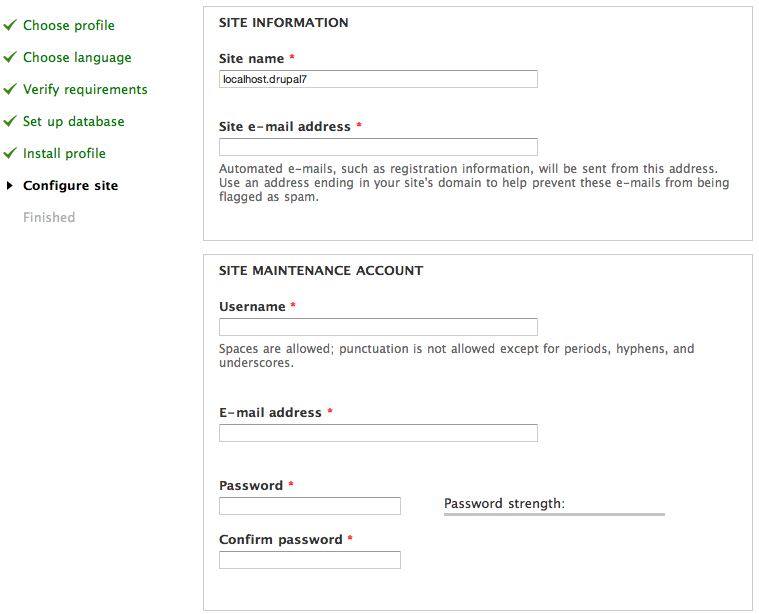
Configure site
Input the information for the first user account (which will be automatically assigned full administration permissions) and provide basic web site settings.
In the Site name field enter the name you wish to use for the site. You can also edit it later through the administration interface.
In the Site e-mail address field, enter the e-mail address that will be used by Drupal when it sends out notifications such as registration information.
In the Site maintenance account field, enter the Username, E-mail address, andpassword for the main administration account.
Note that there is a distinction, as of Drupal 7, between the main administration account that you set up on this page, and the "Administrator" site administrator user role that you will see when you visit the "Roles" and "Permissions" pages in the administration interface. The account you set up in the Site maintenance account section during installation is a super-user who has overall control over every aspect of the management and configuration of the site. (This will be http://www.example.com/user/1, for those of you familiar with that account from earlier versions of Drupal.)
In the Server settings field, select your Default country and Default time zone.
In the Update notifications field leave both boxes checked if you want your Drupal server to alert you when updates are required. Often updates relate to security issues and are important to perform. However, if you have restricted Internet connectivity (for example if you are behind a corporate firewall) you may want to leave these settings unchecked and test them later.
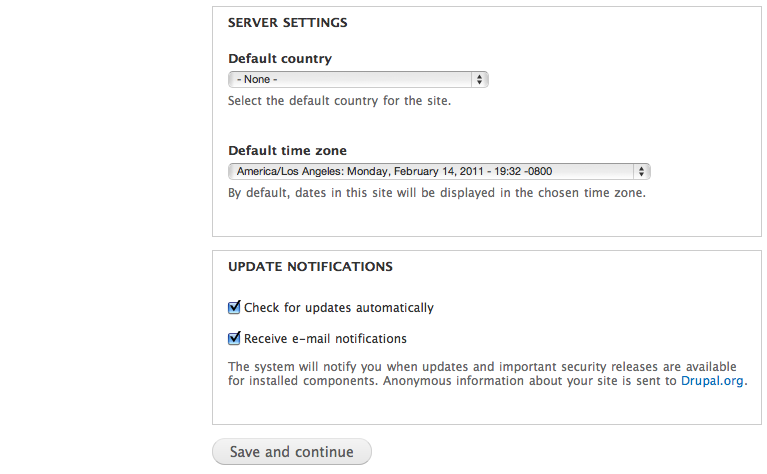
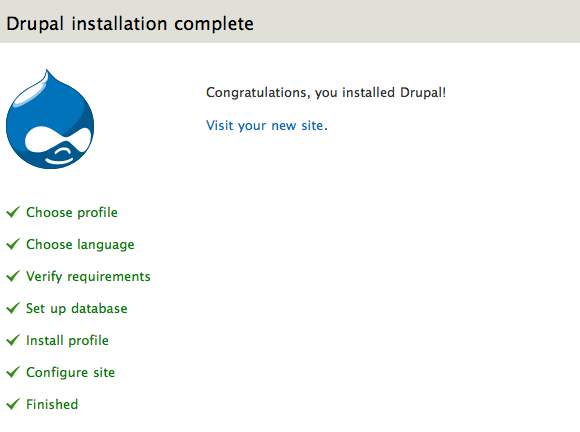
Click "Save and continue". On success you will see the Drupal installation complete screen. If there are any error messages, review and correct them now.
Secure your site
After the installation is complete, you will want to change the permissions on the settings.php file back so that it is protected:
chmod u=rw,o=r,a=r sites/default/settings.php OR chmod 644 sites/default/settings.php
If you make manual changes to the settings.php file later, be sure to protect it again after making your modifications.
Failure to remove write permissions to that file is a security risk. (Although the default location for the settings.php file is at sites/default/settings.php, it may be in another location if you use the multi-site setup.)
Step 5: Set up cron
What is a cron job?
Many Drupal modules have tasks that have to take place from time to time. Think of cron as the tolling of a bell, letting Drupal know that it should perform the appropriate tasks.
The actual "cron job" is a time-triggered action that is usually (and most efficiently) performed by your website's hosting server, but can also be configured by a remote service or even from your own desktop.
For your Drupal site, what actually happens is that the cron job triggers an invisible visit to the site's cron.php file (http://www.example.com/cron.php) which, in turn, executes tasks on behalf of installed modules. [Note: In Drupal 7, the direct path to cron is obscured by a key (to prevent unauthorized bots from hammering your cron). The exact path to your site's cron file – e.g.,http://example.com/cron.php?cron_key=hW309d0DD2Qw4_4NXXnUW7q3SFCQfPP8v11... – is displayed in your site's Status Report.]
Triggering Drupal cron without a cron job
With the inclusion of "Poor man's cron" in the Drupal 7 core, it is no longer necessary to set up a cron job on your web server. Instead, you can configure the frequency with which cron is run on admin/config/system/cron (Administration > Configuration > System > Cron). Cron will then be triggered by end users visiting your site. (You can also disable this functionality entirely for performance here, by setting the "Run cron every" value to "Never" or setting $conf['cron_safe_threshold'] = 0 in settings.php.)
In Drupal 6, you can achieve the same functionality by installing the contributed Poormanscron module.
Step 6: Clean URLs
By default, Drupal uses and generates URLs for your site's pages that look like "http://www.example.com/?q=node/83." This style of URLs can be hard to read, and can prevent some search engines from indexing all the pages of your site. Research suggests this may not be as big of a problem for major search engines as it once was; however, it is worth noting the recommendation from Google's webmaster guidelines stating:
If you decide to use dynamic pages (i.e., the URL contains a "?" character), be aware that not every search engine spider crawls dynamic pages as well as static pages. It helps to keep the parameters short and the number of them few.
If you are unhappy with the default URLs in Drupal, you may be able to tell Drupal to use "clean URLs", eliminating the "?q=" in your site's URLs, and this page explains how to do it. The instructions below are largely applicable only for the most common server setup, which is an Apache web server running on some flavor of Unix/Linux, with the mod_rewrite Apache moduleconfigured and mod_rewrite enabled in httpd.conf configuration file. If you are running Drupal on a different type of server, check the links section below (just above the Comments section of this page) to see if there might be something that addresses your server configuration on a different page.
Before enabling clean URLs in the Drupal configuration screens (see below), you may need to prepare your server for clean URLs to work. There are two ways to prepare your server for clean URLs to work in Drupal. If you have complete control of your server, for example because you run your own server, are installing a development site on your personal computer, or have a dedicated server hosting account, then you should enable clean URLs in the httpd.conf file for better performance and security. However, if you have a shared hosting account (at DreamHost, BlueHost, HostGator, GoDaddy, 1and1, et al.), you will not be able to modify the httpd.conf file and should use the Drupal .htaccess file instead.
Clean-Urls Test - False Negatives
On some setups the Clean Urls test gives a false negative result. If you can visit Clean Url links like http://example.com/user/login and Drupal returns the user login page, .htaccess and mod_rewrite are working. Visiting the Clean Urls admin page directly at http://example.com/admin/config/search/clean-urls, should give you a checkbox that lets you enable Clean Urls. See http://drupal.org/node/1178850. Note: If Clean Urls like http://example.com/user/login. stops working (switching hosts) you can visit the same page by changing the URL to look like: http://www.example.com/?q=user/login.
Enabling Clean URLs in Drupal
Note: The standard Drupal installation contains a sample .htaccess file which supports clean URLs. It is easy to miss copying this file, because of the leading "dot". So before trying to enable Clean URLs, make sure this file exists in your Drupal installation.
Drupal 7.x
In Drupal 7, the installer tests for compatibility with Clean URLs as a part of the installation process. If the environment is tested as compatible with Clean URLs, it will be enabled as part of the installation process and no further action is required to enable Clean URLs.
If you need to enable Clean URLs post installation, Drupal will run the clean URL test automatically when you navigate to the Clean URLs configuration page (Administer > Configuration > Search and metadata), show the results, and allow you to save configuration.
You can enable or disable it at a later time by following these steps:
Navigate to the Clean URLs configuration page (Administer > Configuration > Search and metadata)
Wait for the automated Clean URLs test to run.
Check or uncheck the Enable clean URLs checkbox
Click "Save configuration"
Even if Clean URLs are successfully enabled at install-time, if you have a dedicated server you may still want to follow the steps (below) to enable the more efficient httpd.conf rewrite method for clean URLs. If you choose to do that, you might want to turn off Clean URLs while you are working on the server.
Drupal 6.x
In Drupal 6, the installer tests for compatibility with Clean URLs as a part of the installation process. If the installer was not able to run the test successfully at install time, you can later follow the instructions below for Drupal 5 to get Clean URLs working. There is one minor difference: Drupal 6 will run the clean URL test automatically when you navigate to the Clean URLs configuration page and will show the results, in place of giving you a link to run the test manually.
Also note that even if Clean URLs are successfully enabled at install-time, if you have a dedicated server you may still want to follow the steps (below) to enable the more efficient httpd.conf rewrite method for clean URLs. If you choose to do that, you might want to turn off Clean URLs while you are working on the server.
Drupal 5.x
Here are the steps necessary to enable Clean URLs in Drupal 5:
Here are the steps necessary to enable Clean URLs in Drupal 5:
Go to the Clean URL's (Administer > Site configuration > Clean URLs in Drupal 5) section of the administrative interface.
Look for the paragraph that reads as follows:
This option makes Drupal emit "clean" URLs (i.e. without ?q= in the URL.) Before enabling clean URLs, you must perform a test to determine if your server is properly configured. If you are able to see this page again after clicking the "Run the clean URL test" link, the test has succeeded and the radio buttons above will be available. If instead you are directed to a "Page not found" error, you will need to change the configuration of your server. The handbook page on Clean URLs has additional troubleshooting information. Run the clean URL test.
Click on the Run the clean URL test link at the end of the above paragraph.
If the test is successful, set Clean URLs to "enabled" and save the configuration. If the test is not successful, use the steps below to fix your server configuration and try again.
Prior to Drupal 5.x
For Drupal versions prior to Drupal 5, there is no automatic Clean URLs test or link. Instead, you can test manually by typing in the Clean URL for your settings page: http://www.example.com/admin/settings (where www.example.com is replaced by your hostname). If this results in seeing the settings page, and no errors, then Clean URLs are safe to enable, and you can do so with the setting on this page. If there is an error, follow the instructions below to configure your server.
Error recovery
Enabling "Clean URLs" when your server is not properly configured (i.e. if the Clean URLs tests described above fail) can make it difficult to navigate back to administration pages to undo your mistake, because all the Drupal-generated menus and links will have URLs that do not work. If you find yourself in this situation, you can return to the administrative settings page by typing in the URL in the 'non-clean' form: http://www.example.com/?q=admin/settings for the admin settings page in Drupal 4.x, or http://www.example.com/?q=admin/settings/clean-urls to get to the Drupal 5 or Drupal 6 Clean URLs settings page. Once there, you should be able to reset to not using Clean URLs.
There are additional instructions for recovering from malfunctioning Clean URLs the Handbook page Unset clean URLs.
Server configuration for Clean URLs on a dedicated server, with httpd.conf
Enabling clean URLs on a dedicated server involves these steps:
Enable mod_rewrite for Apache. You can talk to your web host or consult the Apache documentation for mod_rewrite to get more information on how to do this. At a minimum, this will involve making sure that mod_rewrite is enabled for your installation of Apache.
To test if mod_rewrite is available in Apache2, you can type the following at a command prompt, to list all installed Apache modules:
apache2ctl -M
On some systems this command may be:
apachectl -M
In the output, check to see if the rewrite_module is included in the list of modules.
If the rewrite module is not in the list, it will have to be either compiled-in or made available as a loadable module. Generally speaking, you can tell Apache to load the module by including
LoadModule rewrite_module modules/mod_rewrite.so
AddModule mod_rewrite.c
in your Apache configuration file (see below for information on the configuration file). Be sure to uncomment AddModule mod_rewrite.c, if it is in your configuration file but has been commented out. The following may work to enable the module without editing any files:
a2enmod rewrite
Note that these approaches may not work for all combinations of operating system and Apache server -- consult the Apache documentation that came with your Apache software for the correct syntax.
Remember to restart Apache for the new configuration to take effect.
The next step is to locate the appropriate Apache configuration file for your site. Depending on your server configuration, the appropriate Apache configuration file could be httpd.conf, a virtual-host-specific file (vhost.conf), a specific site file (e.g. "default"), or apache2.conf. They are usually located in /etc/httpd/conf, /etc/apache2, or a sub-directory; if not, try the command:
find /etc -name httpd*
to find the file if it is located elsewhere in your file system.
If you do not have write permissions to these files, and Clean URLs are not working out-of-the-box for you, you may have to ask your systems administrator or hosting provider for help. You may still be able to read these configuration files to troubleshoot a little however.
The next step is to copy or include the Drupal-specific settings directly into your configuration file. There are instructions here for how to include the Drupal directives in your configuration file. Consult the .htaccess file in Drupal page for examples of rules, such as the following:
<Directory /var/www/example.com>
RewriteEngine on
RewriteBase /
RewriteCond %{REQUEST_FILENAME} !-f
RewriteCond %{REQUEST_FILENAME} !-d
RewriteRule ^(.*)$ index.php?q=$1 [L,QSA]
</Directory>
Make sure that you are looking at the .htaccess file for your major version of Drupal (i.e., 7.x, 6.x, 5.x). If
Note: If you do not want to put the rewrite rules in your Apache configuration file, you can still simply use the Drupal .htaccess file (as you would if you were on shared hosting). You will need to have the Allow Override directive set in your Apache configuration file (this will allow local .htaccess overrides on your site):
AllowOverride All
AccessFileName .htaccess
Read Behind the scenes with Apache's .htaccess for a thorough review of .htaccess. You may also find it helpful to view samples of Apache 2 AllowOverride directives.
Note Regarding MultiViews: Apache supports a feature called "MultiViews" (more generally: "Content Negotiation"), which allows navigation to your pages without the need for file extensions. For instance, if you had a file called "evaluation.txt", a MultiViews-enabled site could access this file with the URL "example.com/evaluation". While MultiViews can be a handy feature when used knowingly, it can cause problems when Drupal's Clean URLs are enabled. Unless you know what you're doing, you should not use MultiViews if you plan to use the Clean URLs feature of Drupal. However, MultiViews is not enabled in a default Apache installation, so it is likely that this note will not apply. Consult the Apache documentation for further information about MultiViews.
Server configuration for Clean URLs on a shared server, with .htaccess
The standard Drupal installation contains a sample .htaccess file which should be sufficient to get Clean URLs running. It is easy to miss copying this file, because of the leading "dot". So before trying to enable Clean URLs, make sure this file exists in your Drupal installation.
To check for this in terminal, use ls -a to make sure the "dot" files are also listed.
If you have this file installed, but Clean URLs still do not work, you can try some of the troubleshooting suggestions below. If you still cannot get Clean URLs to work, contact your hosting provider.
Fixing problems
Check that .htaccess is even being used
Apache needs to be explicitly told to respect the instructions in your sites .htaccess file. This is off by default, though most hosts will have turned it on. That is what the AllowOverride Alldirective above does - it makes .htaccess start working.
To check if your host is currently even reading your .htaccess, you can (temporarily) add some garbage string to the file in an attempt to break it. Your site should immediately start returning a "500 Server Error" when you load a page from that directory due to this misconfiguration. (Remove the garbage string immediately.)
If you do this, and your site does not break - then .htaccess is being ignored and you will not be able to use clean URLs until you get support from your hosts, or enable it in httpd.conf as described above. Some hosts allow you to enable this option through their site management control panel, so look there first.
RewriteBase setting
The main configuration option which may need to be changed for your site is the RewriteBase. This can be specified in the Drupal .htaccess file or in the httpd.conf file, depending on where you are putting the Drupal rewrite directives (see above). By default, the RewriteBase setting is commented out of the Drupal .htaccess file, and that works well for many configurations.
If you are having trouble getting Clean URLs to work, you may need to change this setting. For example, if your Apache DocumentRoot is /var/www/ (i.e., /var/www/index.html is what is displayed when you point your browser at http://www.example.com/) and your Drupal installation is installed in the subdirectory /var/www/mysite/, then the RewriteBase could be set to
RewriteBase /mysite
and that might help. In some configurations, setting
RewriteBase /
will allow clean URLs to work.
$base_url
You may need to manually set the $base_url variable in the settings.php file if not already set. It's currently known that servers running FastCGI can run into problems if the $base_url variable is left commented out (see http://bugs.php.net/bug.php?id=19656).
Multi-site
RewriteBase works when your Drupal installation serves only one site, or when all the sites it serves are in the same subdirectory of their domains. For example,
RewriteBase /
will work for the following sites:
http://www.example.com/
http://www.example2.com/
http://www.example3.com/
RewriteBase /mysite
will work for the following sites:
http://www.example.com/mysite
http://www.example2.com/mysite
http://www.example3.com/mysite
However, if your sites are in different subdirectories, RewriteBase will not work. You will need to create a special rule for each subdirectory. For example, your Drupal installation may serve the following sites:
http://www.example.com/
http://www.example.com/mysite
In order to enable clean URLs for both sites, you will need to add
RewriteCond %{REQUEST_FILENAME} !-f
RewriteCond %{REQUEST_FILENAME} !-d
RewriteCond %{REQUEST_URI} ^/mysite/(.*)$
RewriteRule ^(.*)$ /mysite/index.php?q=$1 [L,QSA]
before the existing rewrite rules.
Location of index.php
For some server configurations, another change to the Drupal .htaccess file may be necessary. Find a line that looks like this, near the end of your Drupal .htaccess file:
RewriteRule ^(.*)$ index.php?q=$1 [L,QSA]
You may need to replace index.php with the URL path to your Drupal installation's index.php file (only the part after the base URL). For instance, if your site's home page URL is http://example.com/subdir/, you might need to use /subdir/index.php instead of index.php. If your site's home page URL is http://example.com/, you might need to use /index.php instead ofindex.php. This is necessary on some, but not all server configurations.
Clean URLs on Windows servers with IIS
Starting from Drupal 7, the package includes a basic web.config file for use with IIS.
See this article for more information and setup instructions.
Create Even Cleaner URLs with the Path Module
Using Clean URLs will cause Drupal to generate URLs in the form "http://www.example.com/node/83." In order to change the 'node/##' portion of the URL to something more like 'news/june-1st-news' a site will need the Path module enabled. See the Path module handbook page for more information on using the path module.
No comments:
Post a Comment